
How to Install a Big Brake Kit for Maximum Stopping Power


When it comes to enhancing the performance of your vehicle, one of the most critical upgrades you can make is installing a Big Brake Kit. Whether you’re an enthusiast looking to increase track performance, or simply want to improve your vehicle’s safety, a big brake kit offers a significant boost in stopping power and overall braking efficiency.
Standard brake systems may suffice for everyday driving, but they often struggle to provide adequate stopping power during high-stress situations or demanding driving conditions. A big brake kit typically includes larger rotors, multi-piston calipers, and high-performance brake pads, all designed to dissipate heat more effectively and deliver consistent, reliable braking performance.
In addition to improving safety and control, installing a big brake kit can greatly enhance your vehicle’s overall driving dynamics. You’ll experience reduced brake fade, a firmer pedal feel, and a more confident driving experience. Upgrading your brakes not only affects stopping distance but can also complement other performance modifications you’ve made to your vehicle, resulting in a more balanced and responsive ride.
In this article, we will explore the benefits of a big brake kit, discuss the installation process, and provide tips on choosing the right kit for your specific vehicle. Whether you’re navigating through city traffic or tackling winding mountain roads, a big brake kit is a worthy investment for anyone serious about their driving experience.
Understanding the Components of a Big Brake Kit
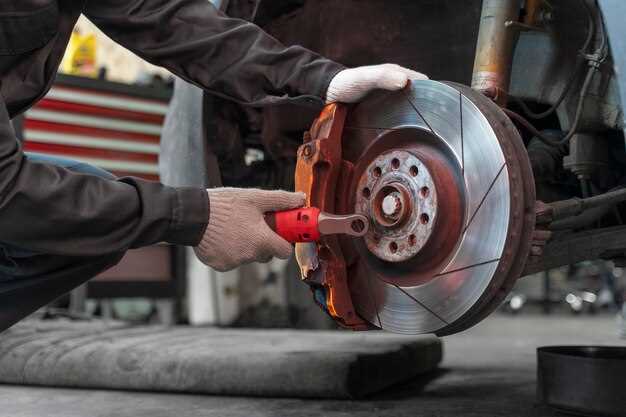
A Big Brake Kit (BBK) enhances a vehicle’s braking performance significantly. Understanding its components is essential for anyone considering an upgrade.
At the core of a BBK are the calipers. These components house the brake pads and apply pressure to the rotors when the brake pedal is pressed. Big brake kits typically feature larger, multi-piston calipers, which distribute braking force more evenly and improve heat dissipation, leading to better stopping performance.
The rotors are another critical part of the system. BBK rotors are usually larger in diameter compared to stock rotors, allowing for increased surface area for the brake pads to make contact. This larger surface area enhances braking power and reduces the likelihood of brake fade during intense driving conditions. Additionally, many BBK rotors feature venting or cross-drilled designs, which further aid in heat management.
Brake pads in a big brake kit are also specially designed for improved performance. They are often made from high-friction materials, allowing for better grip on the rotor. Some kits offer different compounds for various driving conditions, from daily driving to high-performance racing.
Another consideration is the brake lines. Many big brake kits come with upgraded stainless steel braided brake lines, which provide a firmer brake pedal feel and greater durability compared to standard rubber lines. These lines help maintain consistent brake pressure under hard braking conditions.
Finally, an installation hardware kit is included in most BBKs. This kit consists of necessary mounting brackets, bolts, and spacers required for proper installation. Ensuring that all components fit correctly is crucial for maximizing the kit’s performance.
In conclusion, understanding the components of a big brake kit is vital for anyone looking to enhance their vehicle’s stopping power. Each part plays a significant role in improving performance, safety, and driving experience.
How to Choose the Right Big Brake Kit for Your Vehicle
Selecting the appropriate big brake kit for your vehicle can significantly enhance your stopping power and overall performance. Consider the following factors to make an informed choice:
- Vehicle Compatibility:
Ensure the brake kit is specifically designed for your make and model. Universal kits may not fit properly or may require additional modifications.
- Driving Style:
Identify how you use your vehicle. Street driving, track racing, or off-roading may require different brake characteristics. Choose a kit that aligns with your driving habits.
- Brake Rotor Size:
Larger rotors provide better heat dissipation and stopping power. Check the maximum rotor size that can fit within your wheels and consider upgrading if possible.
- Brake Pad Material:
Evaluate the type of brake pads included in the kit. Options include ceramic, metallic, or carbon-carbon materials, each offering different levels of performance, longevity, and dust production.
- Caliper Type:
Big brake kits typically come with either single or multi-piston calipers. Multi-piston calipers provide more even pressure and improved modulation, especially important for high-performance applications.
- Installation Requirements:
Review the installation process. Some kits are designed for easy bolt-on installation, while others may require advanced mechanical skills or professional help.
- Brand Reputation:
Research manufacturers and opt for brands with positive reviews and a history of quality. Reliable customer support and warranty can also be indicators of a reputable brand.
- Budget Considerations:
Set a clear budget, but remember that cheaper kits may compromise quality and safety. Balance cost with the kit’s performance features and durability.
By assessing these factors thoroughly, you can select a big brake kit that enhances the stopping performance and safety of your vehicle, tailored to your specific needs and driving conditions.
Step-by-Step Installation of a Big Brake Kit
Installing a Big Brake Kit can significantly enhance your vehicle’s stopping power and overall performance. Follow these detailed steps to ensure a successful installation.
Step 1: Gather Your Tools and Materials
Before beginning, collect the necessary tools: a jack, jack stands, a lug wrench, socket set, torque wrench, brake cleaner, and any specific tools recommended by the Big Brake Kit manufacturer. Ensure you have all the components of the kit, including calipers, brake rotors, mounting brackets, and necessary hardware.
Step 2: Prepare Your Vehicle
Start by parking your vehicle on a flat surface and setting the parking brake. Loosen the lug nuts on the front wheels slightly before lifting the car with a jack. Secure the vehicle with jack stands to ensure stability during the installation process.
Step 3: Remove the Wheels
Completely remove the lug nuts and take off both front wheels, providing clear access to the brake assembly. Store the nuts in a safe place for reinstallation later.
Step 4: Uninstall the Stock Brake Components
Begin by removing the stock calipers. Disconnect the brake line from the caliper using a line wrench to avoid stripping the fitting. Once disconnected, remove the caliper from its mounting bracket. Next, take off the stock brake rotors by unscrewing any retaining screws or simply pulling them off after removing the caliper.
Step 5: Install Bracketry for the Big Brake Kit
Refer to the installation manual provided with the Big Brake Kit to attach the new mounting brackets. Ensure they are positioned correctly and securely fastened using the supplied bolts. Follow the manufacturer’s torque specifications for proper installation.
Step 6: Install New Brake Rotors
Slide the new, larger brake rotors onto the wheel hub. Ensure they sit flat against the hub and align correctly with the mounting bracket. If included, use the retaining screws to secure the rotors in place.
Step 7: Attach the New Calipers
Carefully attach the new calipers over the rotors and brackets. Tighten the caliper mounting bolts according to the specifications, ensuring that they are secure but not overtightened to avoid damage.
Step 8: Connect Brake Lines
Reconnect the brake lines to the new calipers, ensuring proper alignment and tightness. Do not forget to use new copper crush washers if required by your kit to prevent leaks.
Step 9: Bleed the Brake System
Once everything is in place, bleed the brake system to remove any air bubbles. Start at the wheel farthest from the master cylinder and work your way closer, following the correct sequence as specified in your vehicle’s service manual.
Step 10: Reinstall the Wheels
Once the brake lines have been bled and the system is free of air, replace the wheels. Hand-tighten the lug nuts first, and then use a torque wrench to tighten them to the manufacturer’s specifications.
Step 11: Test the Brakes
Before hitting the road, carefully test the brake function in a safe area. Gradually apply the brakes to ensure they are working correctly and feel firm. Check for leaks around the brake lines and calipers.
Once you have verified proper installation and function, you can enjoy the improved stopping power of your new Big Brake Kit.
Common Mistakes to Avoid During Installation
Installing a big brake kit can significantly enhance your vehicle’s stopping power, but it requires careful attention to detail. Here are some common mistakes to avoid during the installation process.
1. Neglecting the Manufacturer’s Instructions
One of the most critical errors is disregarding the manufacturer’s instructions. Each brake kit is designed differently, and following specific guidelines is essential for a successful installation. Ensure you read the provided manual thoroughly before beginning the process.
2. Using Wrong Tools
Using incorrect or substandard tools can lead to improper installation and potential damage to components. Make sure to use high-quality tools that are appropriate for the job, including torque wrenches and socket sets that fit the designated fasteners.
3. Skipping Brake Line Inspection
Before installing the new brake kit, do not overlook the condition of your brake lines. Damaged or worn brake lines can lead to leaks and reduced performance. Inspect all lines for wear, and replace any that show signs of deterioration.
4. Failing to Torque Bolts Properly
Improperly torqued bolts can result in uneven pressure on the braking system, leading to potential failure. Always use a torque wrench to tighten bolts to the specified settings outlined in the installation instructions. This step is crucial to ensure safety and optimal braking performance.
5. Overlooking Caliper Clearance
Ensure there is adequate clearance between the calipers and the wheels. Inadequate space can cause interference, leading to unwanted noise and even damage. Double-check wheel fitment and clearance before finalizing the installation.
6. Ignoring Break-In Procedures
After installation, it’s crucial to follow proper break-in procedures for your new brake pads and rotors. Failing to do so can result in glazing, diminished performance, and premature wear. Be sure to adhere to the recommended break-in cycle to achieve the best results.
7. Not Testing Before Full Operation
Before hitting the road, always conduct a thorough test of your new braking system. Test the brakes at low speeds to check for any unusual noises or performance issues. This step helps in identifying any potential problems before they escalate into serious concerns.
Avoiding these common mistakes can ensure a smoother installation process and significantly improve the performance of your vehicle’s braking system. Taking the time to do things correctly will enhance safety and driving experience.
Testing Your Vehicle’s Performance Post-Installation
After installing a big brake kit, it is crucial to assess your vehicle’s performance to ensure that the upgrades have met your expectations. Start by conducting a series of brake tests in a safe, controlled environment. This may involve finding an open parking lot or a closed track where you can maintain a safe distance from other vehicles.
Begin with a simple stopping test from various speeds, monitoring the distance required to come to a complete stop. Perform these tests at both low and high speeds, typically around 30 and 60 mph. Record the stopping distances to establish a clear baseline for comparison against factory settings.
Pay attention to the brake pedal feel during these tests. A well-installed big brake kit should provide a firm, responsive pedal feel with minimal travel. Evaluate whether the brakes engage smoothly without any unusual vibrations or noises, which could indicate installation issues or component incompatibility.
Additionally, assess heat dissipation during extended use. Conduct a series of aggressive braking maneuvers, simulating real-world conditions, such as hard cornering or panic stops. After several stops, check if the brakes maintain consistent performance or if they start to fade. This is indicative of the kit’s ability to handle intense driving conditions.
Monitor the temperature of the brake components using an infrared thermometer if available. This data can help ascertain if the brakes are operating within their optimal temperature range, which is essential for effective stopping power and longevity.
Finally, compare your findings with your initial expectations and the manufacturer’s advertised performance metrics. Document your results for future reference, as this information will be valuable for any further modifications or assessments of your vehicle’s braking system.
Maintenance Tips for Long-Term Brake Kit Performance
To ensure the longevity and optimal performance of your big brake kit, regular maintenance is essential. By adhering to a few key practices, you can enhance braking efficiency and safety over time.
Firstly, periodic inspection of brake components is crucial. Look for signs of wear such as uneven pad wear, discoloration on rotors, or fluid leaks. This allows for early detection of potential issues, thereby preventing more extensive damage.
Secondly, keep the brake system clean. Brake dust, dirt, and debris can accumulate on various components, leading to reduced performance and increased wear. Use a mild cleaner specifically designed for brakes to keep components free from contaminants.
Additionally, monitor brake fluid levels and quality. Brake fluid should be changed regularly, as it can absorb moisture over time, potentially leading to brake fade or failure. Refer to the manufacturer’s recommendations for specific intervals.
Finally, consider upgrading other related components, such as hoses and lines, to ensure compatibility and improved performance with the new brake kit. High-quality stainless steel braided lines, for example, can significantly enhance responsiveness and reliability.
| Maintenance Task | Frequency | Notes |
|---|---|---|
| Inspect brake pads and rotors | Every 6 months | Look for wear and damage; replace if necessary. |
| Clean brake components | Every 3 months | Use a brake-specific cleaner for best results. |
| Check brake fluid level | Monthly | Replace fluid that appears discolored or contaminated. |
| Upgrade hydraulic lines | As needed | Consider when installing or upgrading other brake components. |
Following these maintenance tips will help preserve the performance of your big brake kit, ensuring you enjoy better stopping power for years to come.